Baklava Babka Buns- Sweet Swirls You’ll Crave
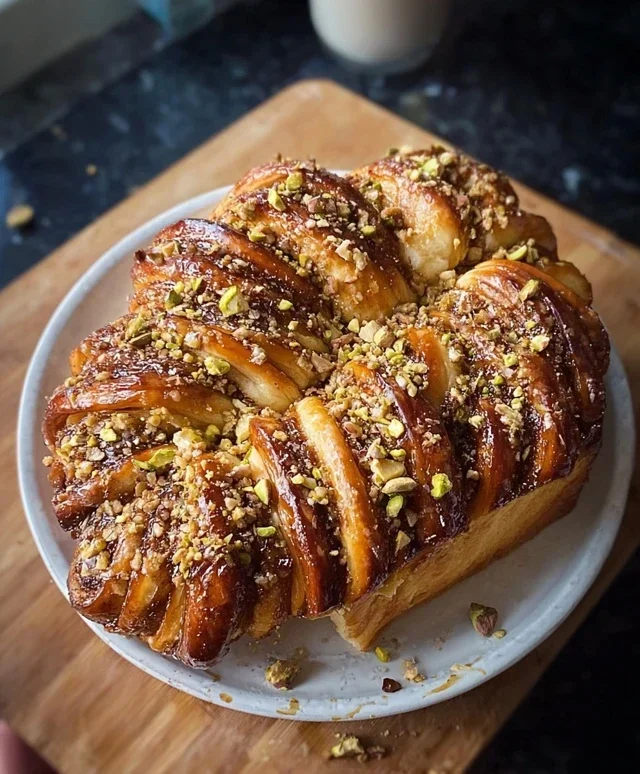
Baklava Babka Buns are here to redefine your sweet treat cravings, bringin extractg together two beloved dessert legends in a single, glorious creation. Imagin extracte the flaky, syrupy wonder of traditional baklava meeting the rich, swirled indulgence of a classic babka, all baked into irresistible, individual buns. It’s a fusion that has us completely captivated, and we think you’ll be just as smitten. People adore baklava for its delicate crispness and the honey-nut symphony, while babka charms with its tender dough and decadent chocolate or cinnamon ribbons. These Baklava Babka Buns capture the essence of both, offering a complex layering of textures and flavors that’s simply divine. What makes them truly special is their approachable format, perfect for sharing (or not!), transforming an already exquisite dessert into an even more delightful, handheld experience.
Get Ready to Bake Your New Favorite Indulgence!
Let’s Dive In!
The Ultimate Baklava Babka Buns Recipe
Get ready to embark on a flavor journey that bridges two beloved baked goods! We’re combining the rich, flaky layers of baklava with the soft, swirled comfort of babka to create these absolutely divine Baklava Babka Buns. Imagin extracte a sweet, spiced nut filling encased in a tender, enriched dough, all kissed with a fragrant honey syrup. They’re perfect for brunch, a special dessert, or anytime you need a little slice of heaven.
Ingredients:
Making the Dough: The Foundation of Flavor
Let’s start by creating the foundation for our delicious buns: a soft and supple dough. In a large mixing bowl, combine the 3 ½ cups of all-purpose flour, ¼ cup of granulated sugar, the instant yeast, and the ½ tsp of salt. Give these dry ingredients a quick whisk to distribute the yeast evenly. Next, in a separate smaller bowl, whisk together the ½ cup of warm milk and the 2 large eggs. Pour this wet mixture into the dry ingredients. Now, it’s time for the magic ingredient that makes babka so rich and tender: the ½ cup of melted unsalted butter. Add this to the bowl as well.
Begin extract mixing everything together. You can use a stand mixer with a dough hook attachment, which is my personal favorite for its ease, or you can get in there with a sturdy spoon and then your hands. Mix until a shaggy dough starts to form. Once it’s too difficult to stir, turn the dough out onto a lightly floured surface. Knead the dough for about 8-10 minutes. You’re looking for a smooth, elastic dough that springs back when you gently poke it. If you’re using a stand mixer, this will take about 6-8 minutes on medium speed. The dough should be slightly sticky but not so sticky that it’s unmanageable. If it’s too sticky, add a tiny bit more flour, a tablespoon at a time. If it’s too dry, add a teaspoon of warm milk.
Once your dough is beautifully kneaded, lightly grease a clean bowl with a little oil. Place the dough in the bowl, turning it to coat all sides. Cover the bowl tightly with plastic wrap or a damp kitchen towel. Let the dough rise in a warm place for about 1 to 1 ½ hours, or until it has doubled in size. This “proofing” stage is crucial for developing flavor and creating that lovely soft texture. A slightly warm oven that’s been turned off is a great spot for this.
Crafting the Baklava Filling
While our dough is doing its thing, let’s prepare the star of the show: the baklava-inspired filling. In a medium bowl, combine the 1 cup of finely chopped walnuts, ½ cup of finely chopped pistachios, the ¼ cup of granulated sugar, and the 1 tbsp of cinnamon. Toss these ingredients together thoroughly until the nuts are evenly coated with sugar and cinnamon. This fragrant mixture is going to create those irresistible pockets of flavor in our buns.
Assembling and Shaping the Buns
Once your dough has doubled in size and is looking wonderfully puffed up, gently punch it down to release the air. Turn the dough out onto a lightly floured surface. Now, we’re going to roll it out into a large rectangle. Aim for a rectangle that’s about 12×18 inches and roughly ¼ inch thick. Try to get it as even as possible.
Next, brush the entire surface of the rolled-out dough with the ¼ cup of melted unsalted butter. Make sure you get all the way to the edges. Now, evenly sprinkle the prepared nut and sugar mixture over the buttered dough. Gently press the filling down a bit with your hands or a rolling pin to help it adhere to the dough.
This is where the babka magic really comes in. Starting from one of the longer sides, tightly roll up the dough into a log. Try to keep the log as even in thickness as possible as you roll. Once you have your log, pinch the seam to seal it shut.
Now, using a sharp knife or a bench scraper, cut the log into 12 equal pieces. These will be our individual buns. You can do this by measuring the log and marking every 1 ½ inches or by simply eye-balling it to get 12 roughly equal portions.
Arrange the cut buns, cut-side up, in a greased 9×13 inch baking pan. You want them to be cozy but with a little room to expand. Cover the pan loosely with plastic wrap or a clean kitchen towel and let them rest for another 20-30 minutes. This second rise will make them nice and fluffy. While they are resting, preheat your oven to 350°F (175°C).
Baking to Golden Perfection
After the second rise, your Baklava Babka Buns will look plump and ready for the oven. Place the pan in the preheated oven and bake for 25-30 minutes, or until the tops are beautifully golden brown and the buns are cooked through.
The Sweet Finishing Touch: The Honey Syrup
While the buns are baking, let’s whip up the finishing touch that truly elevates these to baklava status. In a small saucepan, combine the ½ cup of honey, ¼ cup of water, and 1 tsp of vanilla extract. Heat this mixture over medium heat, stirring until the honey is fully dissolved and the syrup is warm. Don’t let it boil vigorously, just a gentle simmer to combine the flavors.
As soon as the buns come out of the oven, and while they are still hot, generously brush or spoon the warm honey syrup over the tops. The hot buns will soak up that glorious syrup, infusing them with a wonderful sweetness and a touch of that signature baklava shine. Let the buns cool in the pan for at least 15-20 minutes before attempting to remove them, allowing the syrup to set slightly and the buns to firm up. The aroma that fills your kitchen at this stage is absolutely non-intoxicating! Enjoy these decadent treats warm, and savor every sweet, nutty, syrupy bite. They’re a true testament to the joy of combining two classic desserts into something entirely new and wonderfully delicious.
Conclusion:
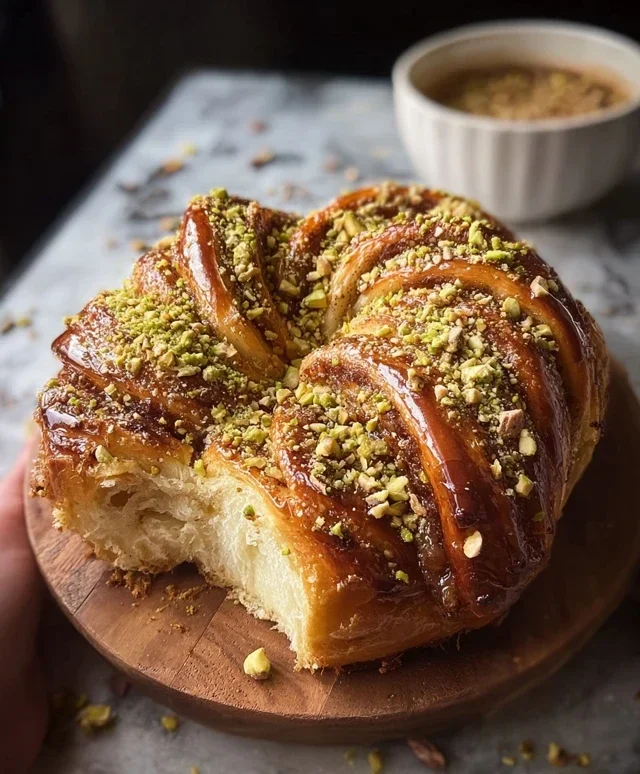
You’ve done it! You’ve successfully created these incredible Baklava Babka Buns, a fusion dessert that’s truly a showstopper. The journey of swirling rich nut filling within layers of tender, brioche-like dough, then baking it to golden perfection and drenching it in that sweet, sticky syrup, is incredibly rewarding. These buns offer a delightful textural contrast – the soft, yielding interior giving way to that satisfying crunch of nuts and flaky pastry edges. They are, quite simply, a triumph of flavor and texture!
These Baklava Babka Buns are fantastic served warm, ideally with a steaming cup of coffee or tea. They are also a decadent treat on their own. For an extra touch of indulgence, consider serving them with a dollop of Greek yogurt or a scoop of vanilla bean ice cream to balance the sweetness. Think of them as perfect for brunches, special occasions, or simply when you crave something truly extraordinary. Don’t be afraid to experiment with the nut fillings – finely chopped pistachios, walnuts, or a mix would be divine. You could even add a hint of orange zest or rosewater to the syrup for a fragrant twist.
I truly hope you give this recipe a try. The combination of beloved baklava flavors with the comforting structure of babka is a winning formula, and I’m confident you’ll fall in love with these buns just as much as I have.
Frequently Asked Questions:
Can I make these Baklava Babka Buns ahead of time?
Yes! You can prepare the dough and let it have its first rise, then wrap it tightly and refrigerate it overnight. You can also assemble and shape the buns, then cover them and let them do their second proof in the refrigerator for up to 24 hours. Bake them straight from the fridge, adding a few extra minutes to the baking time. The syrup is best made fresh before serving.
What kind of nuts are best for the filling?
Traditionally, walnuts are used in baklava, and they work beautifully here. However, pistachios offer a wonderful color and a slightly more delicate flavor. A combination of walnuts and pistachios is also a fantastic choice! Ensure your nuts are finely chopped for the best texture when you bite into the bun.
Baklava Babka Buns
A delightful fusion of traditional babka and baklava, these buns offer layers of spiced nut filling and a sweet honey glaze.
Ingredients
-
3 ½ cups all-purpose flour
-
¼ cup granulated sugar
-
1 packet (2 ¼ tsp) instant yeast
-
½ cup warm milk
-
2 eggs
-
½ cup unsalted butter, melted
-
½ tsp salt
-
1 cup walnuts, finely chopped
-
½ cup pistachios, finely chopped
-
¼ cup granulated sugar
-
1 tbsp cinnamon
-
¼ cup unsalted butter, melted
-
½ cup honey
-
¼ cup water
-
1 tsp vanilla extract
Instructions
-
Step 1
In a large bowl, combine flour, ¼ cup sugar, yeast, and salt. In a separate bowl, whisk together warm milk, eggs, and ½ cup melted butter. Add wet ingredients to dry ingredients and mix until a shaggy dough forms. Knead for 8-10 minutes until smooth and elastic. -
Step 2
Place dough in a greased bowl, cover, and let rise in a warm place for 1-1.5 hours, or until doubled in size. While dough rises, prepare the filling by mixing walnuts, pistachios, ¼ cup sugar, and cinnamon in a bowl. -
Step 3
Punch down the dough and turn it out onto a lightly floured surface. Roll into a large rectangle (about 12×16 inches). Spread the remaining ¼ cup melted butter evenly over the dough, leaving a small border. Sprinkle the nut and cinnamon mixture over the butter. -
Step 4
Tightly roll up the dough from the long edge to create a log. Slice the log into 12 equal pieces. Place buns cut-side up in a greased baking dish. -
Step 5
Cover the buns and let them rise for another 30-45 minutes. Preheat oven to 375°F (190°C). Bake for 20-25 minutes, or until golden brown. -
Step 6
While buns are baking, prepare the glaze by gently heating honey, water, and vanilla extract in a small saucepan until combined. Brush the warm glaze over the hot buns as soon as they come out of the oven.
Important Information
Nutrition Facts (Per Serving)
It is important to consider this information as approximate and not to use it as definitive health advice.
Allergy Information
Please check ingredients for potential allergens and consult a health professional if in doubt.