Cardamom Fig Thumbprint Cookies-Sweet Delight
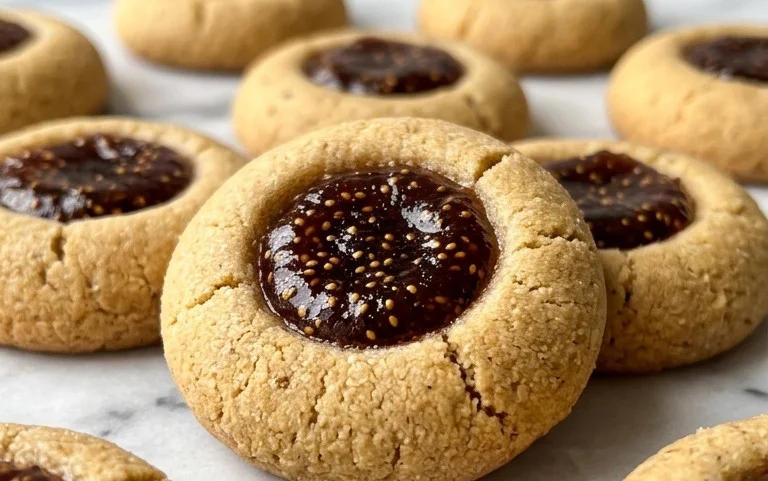
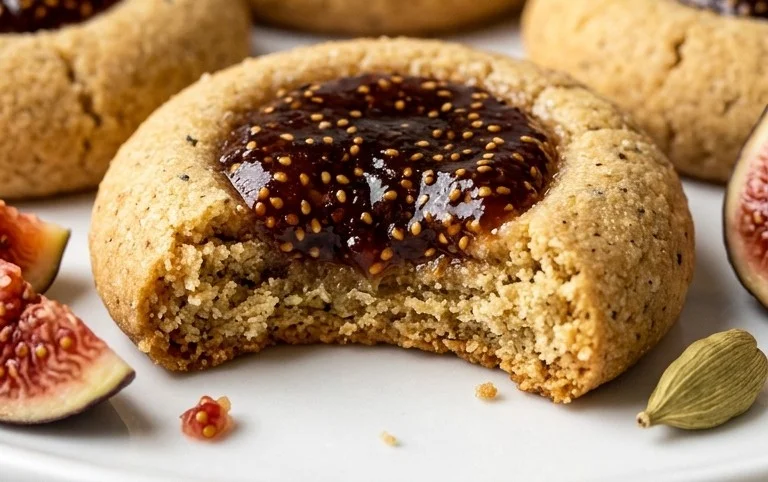
Cardamom Fig Thumbprint Cookies are more than just a sweet treat; they’re a delightful journey for your senses, a harmonious marriage of warm, aromatic spice and the natural sweetness of sun-kissed figs. I’ve always been captivated by the unique flavor profile of cardamom, and when combined with the chewy, jammy center of a perfectly baked cookie, it creates something truly magical. These aren’t your average cookies. They possess an inherent elegance, making them a sophisticated addition to any cookie platter or a cherished homemade gift. The subtle perfume of cardamom dances with the rich, slightly earthy notes of the fig jam, resulting in a flavor that’s both comforting and intriguing. Everyone I share these Cardamom Fig Thumbprint Cookies with is instantly smitten, marveling at how such simple ingredients can create such an extraordinary taste experience. What truly sets these Cardamom Fig Thumbprint Cookies apart is their perfect balance – a delicate crispness giving way to a lusciously tender interior, studded with pockets of sweet, bursting fig goodness. They’re an absolute showstopper.
Cardamom Fig Thumbprint Cookies
These Cardamom Fig Thumbprint Cookies are a delightful twist on a classic. The warm, aromatic spice of cardamom beautifully complements the sweet, rich fig jam, all encased in a tender, buttery cookie. They’re perfect for holidays, special occasions, or simply when you want to bake something truly special. The process is wonderfully simple, and the results are elegant and delicious. Let’s get baking!
Ingredients:
Instructions:
Step 1: Preparing the Dry Ingredients
Begin extract by whisking together your dry ingredients in a medium bowl. This ensures that the leavening agents and salt are evenly distributed throughout the cookie dough, which is crucial for consistent texture and rise. In your bowl, combine the 2 cups of flour, 1/4 teaspoon of salt, and 1/4 teaspoon of baking soda. Add the 1 teaspoon of ground cardamom to this mixture. Cardamom is the star spice here, so don’t skimp! Give it all a good whisk until everything is well incorporated. Set this bowl aside while you move on to the wet ingredients. This simple step prevents pockets of salt or baking soda in your cookies, leading to a more pleasant eating experience.
Step 2: Creaming the Butter and Sugar
In a large mixing bowl, or the bowl of your stand mixer fitted with the paddle attachment, cream together the 3/4 cup of sugar and 1 cup of softened butter. You want to beat these together until the mixture is light, fluffy, and pnon-alcoholic ale yellow. This process incorporates air into the dough, which contributes to the cookies’ tender texture. Start on low speed and gradually increase to medium-high. Scrape down the sides of the bowl periodically to ensure all the butter and sugar are fully combined. This typically takes about 3-5 minutes. The softened butter is key here; if it’s too cold, it won’t cream properly, and if it’s too melted, your cookies might spread too much.
Step 3: Incorporating Wet Ingredients and Egg Substitute
Once the butter and sugar mixture is wonderfully creamy, it’s time to add the liquid flavorings and the binder. Beat in the 1 teaspoon of vanilla extract. Then, add the 1 tablespoon of prepared plant-based egg substitute (or 1 traditional egg, if you prefer). If using a traditional egg, you might want to whisk it lightly in a small bowl before adding it to the butter mixture. Beat on medium speed until everything is just combined and smooth. Be careful not to overmix at this stage; we’re just looking for a cohesive mixture. Overmixing can develop the gluten in the flour too much, resulting in tougher cookies.
Step 4: Combining Wet and Dry Ingredients
Now, it’s time to bring our dry and wet ingredients together. Gradually add the bowl of dry ingredients to the wet ingredients in your mixing bowl. Mix on low speed until just combined. It’s important to mix only until the flour streaks disappear. Overmixing at this stage will lead to tough cookies, so be patient and stop as soon as the dough comes together. The dough will be soft and slightly sticky. If it seems too sticky to handle, you can chill it in the refrigerator for about 15-20 minutes, but it’s usually manageable as is. Don’t worry if it doesn’t look perfectly smooth; some lumps are perfectly fine.
Step 5: Shaping and Creating the Thumbprints
Preheat your oven to 350°F (175°C). Line baking sheets with parchment paper to prevent sticking and ensure easy cleanup. Roll the cookie dough into 1-inch balls and place them about 2 inches apart on the prepared baking sheets. Now comes the fun part: creating the thumbprints! You can use your thumb or the back of a small spoon or measuring spoon to gently press an indentation into the center of each cookie ball. Aim for a well that is deep enough to hold a good amount of jam, but not so deep that it goes all the way through the cookie. Be gentle to avoid cracking the edges of the cookie. If the dough is a little sticky, lightly wetting your thumb or the back of the spoon can help prevent sticking.
Step 6: Filling and Baking
Carefully spoon about 1/2 to 1 teaspoon of your favorite fig jam into each indentation. You want to fill the wells generously but avoid overfilling, which can cause the jam to overflow during baking. The jam will bubble and spread slightly as it cooks. Bake the cookies in the preheated oven for 12-15 minutes, or until the edges are lightly golden and the centers are set. The exact baking time will depend on your oven and the size of your cookies. Keep a close eye on them towards the end of the baking time to prevent burning. They should look slightly underbaked in the very center, as they will continue to cook slightly on the hot baking sheet after you remove them from the oven.
Step 7: Cooling and Finishing Touches
Allow the cookies to cool on the baking sheets for about 5 minutes before carefully transferring them to a wire rack to cool completely. This allows them to firm up. Once the cookies are completely cool, you can optionally dust them with confectioner’s sugar. Sift about 4 tablespoons of confectioner’s sugar over the cooled cookies for a beautiful, snowy finish. This adds a touch of sweetness and visual appeal. Store your finished Cardamom Fig Thumbprint Cookies in an airtight container at room temperature for up to 3-4 days. Enjoy these delightful, spiced treats!
Conclusion:
These Cardamom Fig Thumbprint Cookies are truly a triumph of flavor and texture! The warm, aromatic notes of cardamom beautifully complement the sweet, slightly chewy fig filling, all encased in a tender, buttery cookie. They strike a perfect balance, offering a sophisticated yet comforting treat that’s ideal for any occasion. Whether you’re looking for a special addition to your holiday cookie platter, a delightful afternoon pick-me-up with a cup of tea, or a thoughtful homemade gift, these cookies are sure to impress.
Feel free to get creative with your serving suggestions! They are wonderful on their own, but also pair exceptionally well with a dollop of whipped cream or a scoop of vanilla bean ice cream. For variations, consider adding a pinch of cinnamon to the cookie dough for an extra layer of spice, or a drizzle of melted dark chocolate over the top once cooled for a touch of decadence. Don’t be afraid to experiment with different dried fruits like dates or cranberries as an alternative to figs. I wholeheartedly encourage you to give these Cardamom Fig Thumbprint Cookies a try – you won’t be disappointed by this delightful recipe!
Frequently Asked Questions:
Can I make these cookies ahead of time?
Absolutely! These cookies store beautifully. Once completely cooled, keep them in an airtight container at room temperature for up to 3-4 days. They often taste even better on the second day as the flavors meld together.
What kind of figs work best for the filling?
Dried Calimyrna or Mission figs are excellent choices. If your dried figs are very hard, you can soften them by soaking them in warm water for about 10-15 minutes before chopping and processing them into a paste. Fresh figs can also be used if they are in season and ripe, though they will result in a softer filling.
My cookie dough is too sticky to handle. What should I do?
If your dough is too sticky, it might be a bit too warm. Try chilling it in the refrigerator for 20-30 minutes. This will firm up the butter and make the dough much easier to handle and roll into balls. You can also dust your hands and work surface lightly with flour, but be careful not to add too much, as this can make the cookies dry.
Cardamom Fig Thumbprint Cookies
Delicate thumbprint cookies infused with the warm spice of cardamom, filled with sweet fig jam, and dusted with confectioner’s sugar for a delightful treat.
Ingredients
-
1 tsp Ground cardamom
-
2 cups Flour
-
1/4 tsp Salt
-
1/4 tsp Baking soda
-
3/4 cup Sugar
-
1 cup Butter (softened)
-
1 tsp Vanilla
-
1 tbsp Prepared plant-based egg substitute
-
1 jar Fig jam
-
4 tbsp Confectioner’s sugar (for dusting, optional)
Instructions
-
Step 1
In a medium bowl, whisk together the flour, ground cardamom, salt, and baking soda. -
Step 2
In a large bowl, cream together the softened butter and sugar until light and fluffy. Beat in the vanilla and plant-based egg substitute until well combined. -
Step 3
Gradually add the dry ingredients to the wet ingredients, mixing until just combined and a soft dough forms. -
Step 4
Preheat oven to 350°F (175°C). Line baking sheets with parchment paper. Roll dough into 1-inch balls and place them on the prepared baking sheets, about 2 inches apart. -
Step 5
Using your thumb or the back of a small spoon, create an indentation in the center of each cookie. Fill each indentation with about 1 teaspoon of fig jam. -
Step 6
Bake for 10-12 minutes, or until the edges are lightly golden. Let the cookies cool on the baking sheets for a few minutes before transferring them to a wire rack to cool completely. -
Step 7
If desired, dust the cooled cookies with confectioner’s sugar before serving.
Important Information
Nutrition Facts (Per Serving)
It is important to consider this information as approximate and not to use it as definitive health advice.
Allergy Information
Please check ingredients for potential allergens and consult a health professional if in doubt.