Cheesy Dynamite Chicken Buns – Spicy Comfort Food
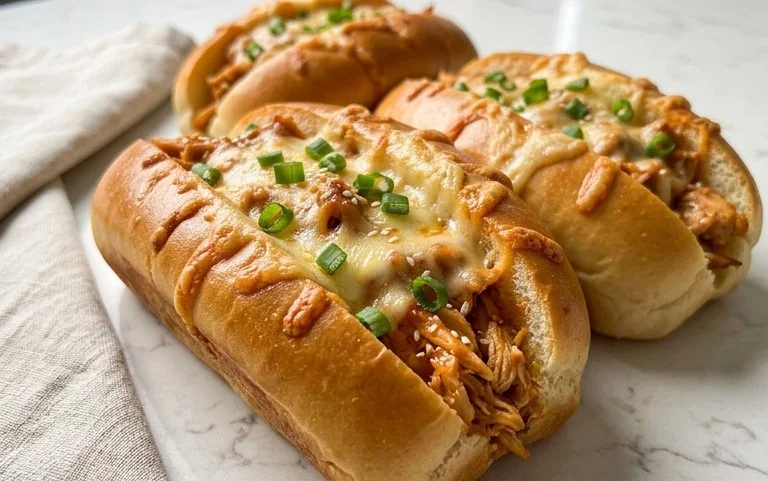
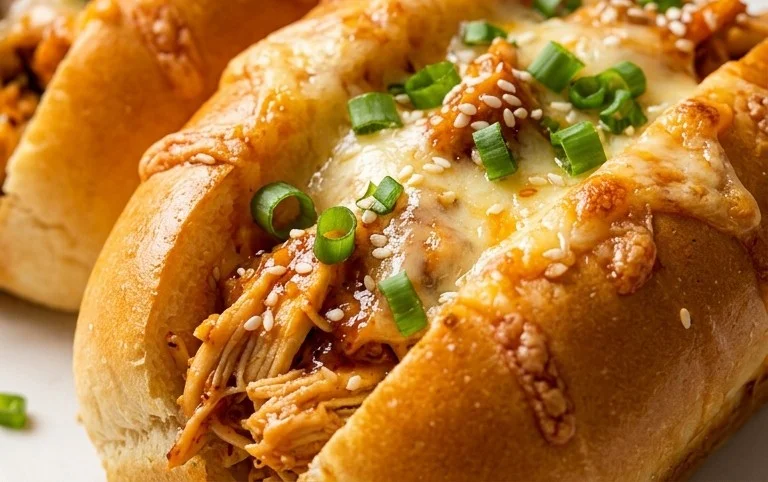
Cheesy Dynamite Chicken Buns are about to become your new obsession. Imagin extracte this: fluffy, warm buns encasing tender, shredded chicken that’s been tossed in a creamy, spicy, and utterly addictive sauce. Then, to elevate it all, we’re talking about a generous blanket of melted, gooey cheese that promises that satisfying pull with every bite. This isn’t just a meal; it’s an experience! People absolutely adore Cheesy Dynamite Chicken Buns because they hit all the right notes – comforting, flavorful, and just a little bit exciting. The “dynamite” element comes from that perfect balance of heat and savory goodness, creating a flavor explosion that leaves you craving more. What makes our Cheesy Dynamite Chicken Buns truly special is the careful layering of flavors and textures, ensuring each bite is a delightful surprise.
Get Ready for Flavor!
Your Next Favorite Recipe Awaits
Cheesy Dynamite Chicken Buns
Get ready to ignite your taste buds with these incredibly flavourful Cheesy Dynamite Chicken Buns! Imagin extracte tender, juicy chicken, infused with a kick of spice, all wrapped up in a soft, pillowy bun, topped with a generous sprinkle of cheesy goodness. These are perfect for a satisfying lunch, a fun appetizer, or even a delightful weekend treat. We’re going to walk through this step-by-step, so even if you’re new to baking, you’ll end up with bakery-worthy results. Let’s get started on creating these little explosions of flavour!
Ingredients:
Making the Dough
First things first, we need to get our dough ready. This is the foundation of our delicious buns, so we’ll give it the attention it deserves. In a large mixing bowl, combine the 75 ml of warm water (not hot, you don’t want to kill the yeast!), 200 ml of milk, and 15 g of honey. Give this a gentle stir to dissolve the honey. Now, sprinkle in the 9 g of instant yeast. You can either stir it in gently or just let it sit on top for a minute. We want to see some foamy action on the surface, which is a sign that your yeast is alive and ready to work its magic. Let this mixture sit for about 5-10 minutes until it becomes frothy.
Once your yeast mixture is happy and bubbly, it’s time to add the other wet ingredients. Crack in 1 egg and pour in 30 ml of sunflower oil. Whisk this all together until everything is well combined. Now, let’s introduce the dry ingredients. Add the 600 g of flour and 8 g of salt to the bowl. If you’re using a stand mixer with a dough hook, now’s the time to attach it. If you’re kneading by hand, use a sturdy spoon or spatula to start bringin extractg everything together.
Mix until a shaggy dough begin extracts to form. Once it starts to come together, you can turn it out onto a lightly floured surface. Begin extract kneading. If you’re using a stand mixer, knead on medium-low speed for about 8-10 minutes. If you’re kneading by hand, this will take a bit longer, around 10-15 minutes. The goal is to develop the gluten in the flour, which will give your buns their wonderful chewy texture. You’re looking for a dough that is smooth, elastic, and springs back slowly when you gently poke it with your finger. It should no longer be sticky.
First Rise (Proofing the Dough)
Now that you have a beautifully kneaded dough, it’s time to let it rest and rise. Lightly grease a clean bowl with a little bit of oil. Place the dough into the bowl, turning it to coat all sides with the oil. This prevents a dry skin from forming. Cover the bowl tightly with plastic wrap or a damp kitchen towel. Find a warm, draft-free spot in your kitchen for the dough to do its thing. This could be on top of your refrigerator, in a slightly warmed (but turned off!) oven, or just a cozy corner of your counter.
We’re going to let the dough rise until it has doubled in size. This usually takes about 1 to 1.5 hours, depending on the warmth of your environment. Patience is key here! Don’t be tempted to rush it. A good, slow rise leads to a better texture and flavour. You’ll know it’s ready when it looks visibly puffed up and airy.
Preparing the Dynamite Chicken Filling
While our dough is getting plump and happy, let’s get to the heart of our buns: the dynamite chicken filling. Take your 700 g of chicken filet and pat it dry with paper towels. This helps ensure a better sear. Dice the chicken into small, bite-sized pieces, about 1-inch cubes. In a medium bowl, season the chicken generously with 5 g of salt, 2 g of cayenne powder, 1.5 g of onion powder, and 1 g of black pepper powder. This spice blend is what gives our chicken its “dynamite” kick! Mix it all up really well so each piece of chicken is coated in the delicious seasonings.
Now, heat a tablespoon of oil (any cooking oil will do, we didn’t include this in the list as it’s common pantry staple, but assume you have some!) in a non-stick skillet or frying pan over medium-high heat. Add the seasoned chicken pieces in a single layer, being careful not to overcrowd the pan. You might need to cook the chicken in batches. Cook for about 5-7 minutes, stirring occasionally, until the chicken is cooked through and nicely browned on all sides. Once cooked, remove the chicken from the pan and set it aside to cool slightly.
Assembling and Second Rise
Once your dough has doubled in size, gently punch it down to release the air. Turn the dough out onto your lightly floured work surface again. Now, we’re going to divide the dough into equal portions. For standard-sized buns, aim for about 10-12 pieces. You can weigh them if you want to be precise, or just eyeball it. Gently shape each piece of dough into a ball.
Take one ball of dough and flatten it into a disc. You want it thin enough to encase the filling but not so thin that it breaks. Place a generous spoonful of your cooled dynamite chicken mixture in the center of the dough disc. Don’t overfill, or it will be hard to seal. Now, carefully gather the edges of the dough up and over the filling, pinching them together firmly to seal. Roll the dough gently between your palms to create a smooth, round bun shape. Repeat this with all your dough portions and chicken filling.
Place the formed buns onto a baking sheet lined with parchment paper, leaving a little space between them as they will expand. Cover them loosely with plastic wrap or a clean kitchen towel and let them rest for another 30-45 minutes. This second rise is crucial for those light and airy buns. You’ll see them puff up again, looking plump and ready for their final transformation.
Baking and Finishing Touches
Preheat your oven to 190 degrees Celsius (375 degrees Fahrenheit). While the oven is heating, let’s prepare a quick glaze for our buns. In a small bowl, melt the 25 g of butter. Stir in the 40 g of Parmesan cheese. You can add a tiny pinch of extra cayenne powder here if you want an even spicier kick, but that’s entirely optional!
Once the buns have had their second rise, brush the tops of each bun with the melted butter and Parmesan mixture. This will give them a beautiful golden-brown crust and a fantastic cheesy flavour as they bake.
Bake for 18-22 minutes, or until the buns are golden brown and sound hollow when tapped on the bottom. The cheesy topping should be bubbly and slightly crisped.
Remove the Cheesy Dynamite Chicken Buns from the oven and let them cool on the baking sheet for a few minutes before transferring them to a wire rack to cool completely. These are absolutely divine served warm, but they are also delicious at room temperature. Enjoy the explosion of flavour in every bite!
Conclusion:
And there you have it – your guide to creating these utterly irresistible Cheesy Dynamite Chicken Buns! I’m so excited for you to try this recipe. It’s a winner because it strikes that perfect balance between creamy, spicy, and savory, all wrapped up in a soft, pillowy bun. The combination of tender chicken coated in a rich, cheesy dynamite sauce, nestled inside a warm bun, is pure comfort food bliss. These are fantastic as a hearty appetizer for gatherings, a satisfying lunch option, or even a fun dinner. Don’t be afraid to get creative with your fillings or toppings!
I truly encourage you to whip up a batch of these Cheesy Dynamite Chicken Buns soon. They are guaranteed to be a crowd-pleaser, and the joy of sharing something so delicious is unmatched. So, gather your ingredients and get ready for some serious flavor explosions!
Frequently Asked Questions:
Can I make the dynamite sauce spicier?
Absolutely! If you love extra heat, feel free to increase the amount of sriracha or add a pinch of cayenne pepper to the sauce. You can also experiment with different chili pastes for a unique flavor profile.
What are some alternative fillings for these buns?
While chicken is delicious, feel free to get creative! Shredded pulled beef, seasoned ground beef, or even a vegetarian filling like spicy seasoned jackfruit would be fantastic substitutes. Just ensure your filling is cooked through and has a nice, cohesive texture.
How should I store leftover Cheesy Dynamite Chicken Buns?
Store any leftover buns in an airtight container in the refrigerator for up to 2-3 days. Reheat them gently in a low oven or air fryer to maintain their texture. Avoid microwaving, as it can make the buns mushy.
Cheesy Dynamite Chicken Buns
Spicy and cheesy chicken-filled buns perfect for a flavorful snack or light meal.
Ingredients
-
75 ml water
-
200 ml milk
-
15 g honey
-
9 g instant yeast
-
1 egg
-
30 ml sunflower oil
-
600 g flour
-
8 g salt
-
25 g butter
-
40 g Parmesan cheese
-
2 g cayenne powder
-
1.5 g onion powder
-
1 g black pepper powder
-
700 g chicken filet
-
5 g salt
Instructions
-
Step 1
In a large bowl, combine warm water (around 40°C), milk, honey, and instant yeast. Let sit for 5-10 minutes until foamy. -
Step 2
Add the egg, sunflower oil, flour, salt, and butter to the yeast mixture. Mix until a shaggy dough forms, then knead for 8-10 minutes until smooth and elastic. -
Step 3
Place the dough in a greased bowl, cover, and let rise in a warm place for 1-1.5 hours, or until doubled in size. -
Step 4
While the dough rises, dice the chicken filet. In a bowl, mix chicken with 5g salt, cayenne powder, onion powder, and black pepper powder. Cook the chicken in a lightly oiled pan until thoroughly cooked. Let cool slightly, then stir in grated Parmesan cheese. -
Step 5
Punch down the risen dough and divide it into 12 equal portions. Flatten each portion, place a portion of the chicken filling in the center, and seal the edges to form a bun. -
Step 6
Arrange the buns on a baking sheet lined with parchment paper, leaving some space between them. Cover and let them rest for another 20-30 minutes. -
Step 7
Preheat oven to 190°C (375°F). Bake the buns for 20-25 minutes, or until golden brown and cooked through.
Important Information
Nutrition Facts (Per Serving)
It is important to consider this information as approximate and not to use it as definitive health advice.
Allergy Information
Please check ingredients for potential allergens and consult a health professional if in doubt.